If you are new to Adobe Premiere Pro CC or simply not sure which settings are the best to export a project or even multiple ones, here are some tips to get the best results.
There are two ways to export a project and save it as a video file in Premiere Pro. One is directly in the software and other one uses a different program called “Media Encoder”.
First, go to “File”, “Export”, “Media” or simply press “Ctrl+M” on your keyboard.
Once the “Export Settings” window pops up it’s time to choose a format. The current standard for the web is H.264 which is widely used. The final file is going to be *MP4.
Premiere Pro has a lot of presets which are useful but are not always the right fit, depending on the project that is being exported.
All these settings can be customized and saved as your own a preset.
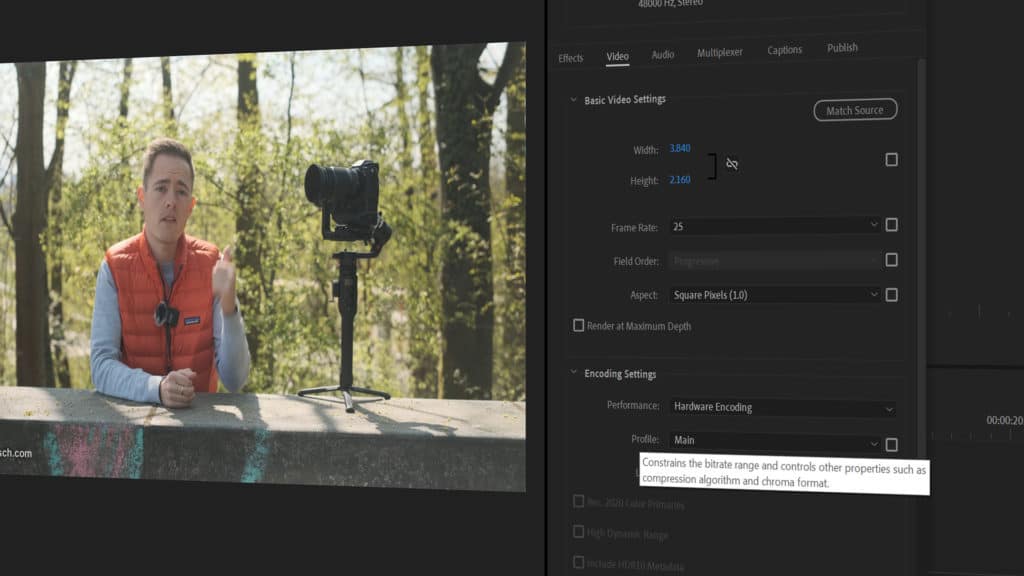
The first thing to check is the resolution of the sequence you want to export. If the video is in Ultra HD and it should be exported in full resolution, double check if the width and height match. It should be 3840×2160 or 1920×1080 for Full HD. If you are exporting an anamorphic video or square the resolution needs to be typed in manually.
The frame rate can also be changed. In the US the standard is 24 frames per second or 30 while in the rest of the world it’s mostly 25fps. It’s important to leave it at the original rate the original footage was captured at. Otherwise video and audio might be out of synch. If you are not sure, check the settings of the sequence.
“Field Order” should be set to “Progressive” unless you are exporting old camcorder footage than was still captured on tape, then you can select “Interlaced”.
“Aspect” can be set to “Square Pixels 1.0”. All the other options are outdated for most of users.
When it comes to color depth it only makes sense to select “Render at Maximum Depth” if the source footage was actually captured in anything higher than 8-bit. Most consumer cameras that record in H.264 are 8-bit only. Newer consumer cameras or professional camcorders can often record in H.265 which is able to save more color information. In this case it’s advised to hit the check mark. But make sure to switch to H.265 at the top because H.264 can’t save 10-bit or higher color information and banding may be visible as you can see in this example. Blue skies are often an easy way to spot an 8-bit image.
If you have a graphics card that support GPU acceleration, make sure to change the “Performance” in the “Encoding Settings” to “Hardware Encoding”. This can make the process of rendering and exporting the video much faster. If you don’t have a fast graphics card you can simply leave this setting at “Software Encoding”.
“Profile” should be set to “Main” or “High”. “Level” should be set to “5.1” or higher otherwise it’s not possible to select a high resolution like 4K.
Unless you are delivering for TV or cinema the next few settings can be ignored. These are some technical color standards that are required by television stations or streaming platforms.
Very important and often discussed are the “Bitrate Settings”. For web delivery I recommend using a bitrate between 7.5Mbps and 15Mbps for Full HD. For Ultra HD or 4K I recommend 35Mbps to 50Mbps. Streaming platforms like YouTube or Vimeo will compress and convert these files again so there are no wrong or right settings. Especially since the required settings can and will change over time.
If you don’t mind bigger file sizes, then I recommend selecting “Constant Bitrate” or “CBR”. This will ensure that the video has the same amount of data throughout the video.
If you want to reduce the file size without too much noticeable compression and loss in quality it’s advisable to switch the “Bitrate Encoding” to “VBR, 2 pass”. “VBR” stands “for variable bitrate”. That means the software will reduce the amount of data in rather static shots without much motion and increase the data if a lot of motion is being detected. This can be helpful when switching between an interview shot and a dynamic b-roll sequence. This can be controlled by selecting a “Target Bitrate” which should be a lower number than “Maximum Bitrate”.
“VBR, 2 pass” encodes the video two times which means it takes longer to export but increases the image quality compared to “VBR, 1 pass”.
A common issue when exporting a video is the loss of quality and pixelation of videos, photos and screen recordings that have been upscaled and zoomed in. The trick to ensure the best possible image quality is to set a check mark at “Use Maxmimum Render Quality” at the bottom of the window.
Further up you can switch to the “Audio” tab. Most settings you can simply leave the way they are already selected. Just make sure to set the “Audio Quality” to “High” and the “Bitrate” to 320Kbps. Otherwise the audio might not sound good.
If you often use the same settings to export a sequence I suggest to save these as a preset. After all your changes to the settings have been made click on the “Save Preset” icon and name it accordingly. I usually write down the main settings as a title. Of course you could simply name the preset “YouTube HD” or “YouTube 4K” depending on what it’s being used for.
You can now simply press on “Export” on the very bottom and a small window with a progress bar is going to pop up.
The second way to export is to click on “Queue”. The project will load the selected sequence in to a different program called “Media Encoder”. This can take a few seconds or even minutes depending on the size of the selected sequence. You can then simply press the green play button to start the export. The advantage of using the Media Encoder is that you can send multiple sequences from one or different project to be rendered one after another. Media Encoder works in the background which means you can close Premiere Pro and work on something else. Or you can edit a different project while simultaneously exporting another video.
Premiere Pro or the Media Encoder sometimes cancel an export for no understandable reason, especially with certain formats like H.265. I recommend exporting to an uncompressed format first. After the file has been successfully exported you can then convert it to H.264 or H.265. Apple ProRes or DNxHD or DNxHR are good options not just to get around this issue but also to have a high quality master to archive the video in the best possible quality.
ProRes can be found by selecting “Quicktime” first and then “Apple ProRes 422”. 4:2:2 should usually be enough unless the camera actually captured 4:4:4 color depth, which only a few cinema cameras are capable of. Further down in the settings you will even find an option to export the file with 16-bit color depth instead of 8-bit.
The bitrate is set by default depending on the ProRes version and resolution of the output.
ProRes *MOV files can also be uploaded to YouTube or Vimeo but are usually too big and since they will be converted and compressed again it’s usually not worth it.
Keep in mind that these are general tips and encoding is constantly changing and improving. Of course there are other video formats to export to but for now H.264 is still the most used format both online and offline.
Written by filmmaker Moritz Janisch on May 3, 2021